

How To Fix A Dryer Witha Crack In The Metal
Clothes Dryer Repair Guide
Updated: Nov. 28, 2018
You can solve most problems yourself—no experience necessary!
Most dryer bug can be fixed in an hour with a few bones tools and a continuity tester or multimeter—and y'all can practice the work yourself with these elementary instructions.
You might likewise similar: TBD
If your dryer breaks down
Here's the first matter to know well-nigh dryer repair: You can solve virtually dryer troubles yourself. There's no need to find a technician, schedule a service call or pay hundreds dollars for dryer repair.
The dryer repair fixes we show in this article right well-nigh 90 percentage of dryer breakdowns. Most repairs accept nigh an hour, but set aside extra fourth dimension to locate replacement parts. To detect parts, search online for "apparatus parts." About parts are relatively cheap. Aside from basic tools like a socket set and screwdrivers, you may need a continuity tester or multimeter to diagnose the problem.
Tip: The beginning step in any apparatus repair is to make sure it'due south getting electricity. Unplugged cords and tripped breakers are a leading cause of appliance "breakdowns."
Dryer disassembly
Most dryer repairs require some disassembly of the outer chiffonier then y'all can become at the parts within and you might not fifty-fifty need a dryer repairman. If your dryer's lint filter is inside the front door (Effigy A), disassemble it this way: Offset, remove the screws at each corner of the command panel. Flip the console up and back to expose the screws in the height panel. Remove the screws, then pull the tiptop toward y'all and lift it off. To open the lesser panel, release the spring catches by shoving a putty knife into the slot but above them. With the bottom console open, you tin can remove the front panel past removing ii screws at the top and ii at the bottom.
If your filter slides into the top of the dryer, remove the screws alongside the filter slot. Using a putty knife, release the two spring catches located under the top panel at the front. Tilt the top panel up similar a automobile hood and remove the screws that concur the front end panel in place.
Figure A: Disassembling a Dryer
Dryer disassembly is slightly different depending on where the lint filter is located, but either manner almost repairs to gas dryers crave that you remove the top and front (non the back or sides) to access the parts.
CAUTION!
Don't go shocked! Unplug the dryer before you exercise any disassembly, diagnostic or dryer repairman work. On a gas dryer, also plow off the gas supply shutoff valve.
Dyer Repair: How to Fix a Dryer that Won't Start
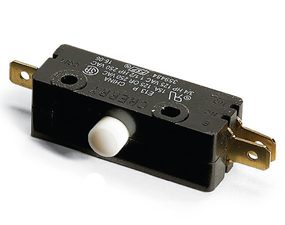
Door switch
Door switches tin can article of clothing out, causing the dryer to end working.
Test the switch
Pull the wires off the door switch. Open and close the door while testing for continuity. If you don't get continuity, replace the switch.
If your dryer seems absolutely dead when you turn information technology on, chances are the door switch is bad or the plunger is broken or bent. Door switches article of clothing out from normal utilize, merely repeatedly slamming the door can speed upward their demise. Offset by checking the plunger located on the door for dryer troubleshooting. If it's missing or bent, replace it. If the plunger checks out, the next step of dryer troubleshooting is to remove the top cabinet panel to gain access to the door switch. See the disassembly instructions.
Exam the switch for continuity. If the switch is good, examination the thermal fuse (run into "No heat" below) mounted on the blower housing. If you lot have a gas dryer with the lint filter in the door, access the thermal fuse past opening the bottom console. If the filter slides into the acme of the machine, remove the entire forepart console. On an electric dryer, remove the rear service panel. If you don't get a continuity reading from the thermal fuse, practise Non simply replace it. A diddled thermal fuse is a warning that you have other serious problems—either a malfunctioning thermostat or a chock-full vent. Fix those before replacing the fuse.
Dryer Repair: Dryer thumps, rumbles or chirps

Supplant drum support rollers
Prune off the old triangular roller keeper and remove the roller. Wipe the shaft with a rag and alcohol and install the new roller and keeper. Do Not lubricate the shaft.
The pulsate support rollers are worn. Supplant all of them. If the noise continues, replace the tensioner roller (see below). Since information technology takes longer to disassemble the automobile than to actually supersede the rollers and belts, we recommend replacing both of them at the same time.
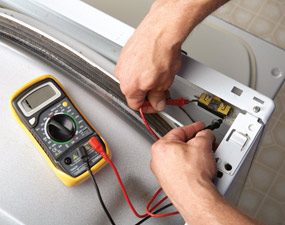
Using a Continuity Tester
Our photos show using a multimeter to diagnose problem. Only a continuity tester, which is much cheaper, will also work for all the troubleshooting in this commodity. To use a continuity tester, but attach the clench to one contact point and touch the probe to the other. If the calorie-free glows, y'all've got continuity. If non, you've got trouble.
Dryer Repair: No heat
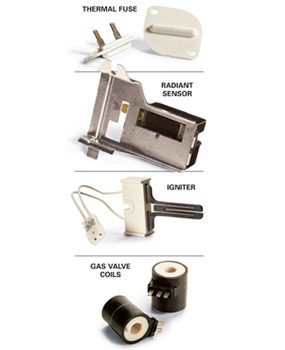
Dryer troubleshooting
The heat won't come on if any of these parts are broken.
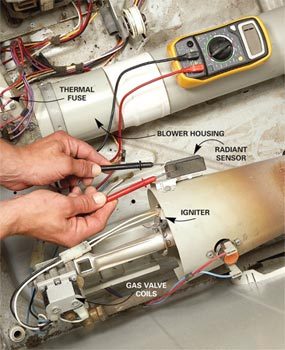
Photo 1: Cheque continuity
On a gas dryer, test the radiant sensor, igniter and thermal fuse by disconnecting the wires and checking for continuity. Replace them if they fail the continuity test.

Photo two: Check the heating element
Disconnect the wires to the heating element of an electrical dryer and examination information technology for continuity. Supplant the element if you don't go a continuity reading.
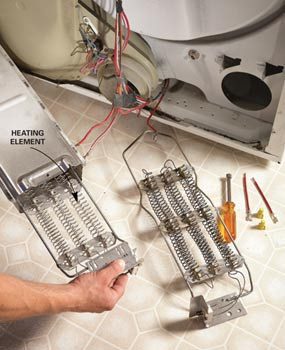
Photo 3: Replacing the heating chemical element
Supercede the bad heating element on an electrical dryer by unscrewing the retaining clip at the summit of the heater box. And so pull out the box and remove the element retaining screw. Swap the elements and reinstall.
If you lot have an electric or gas dryer that tumbles but won't rut, cheque the thermal fuse for continuity. If the thermal fuse checks out, move on to the radiant sensor if you accept a gas dryer. Information technology monitors the igniter and powers upwardly the gas valve coils when the igniter reaches acme temperature. A bum sensor volition terminate the whole testify. Exam it for continuity (Photo 1) and replace it if it fails. If the sensor is good, disconnect the electrical connector to the igniter and check information technology for continuity. Again, supercede it if information technology fails the continuity test. If both the radiant sensor and the igniter laissez passer the test, replace the gas valve coils. To supercede them, remove the retaining plate, unplug the sensors and pull them off the gas valve.
If the thermal fuse on your electrical dryer checks out, examination the heater chemical element for continuity. Supplant the element if you don't get continuity (Photos 2 and 3).
Dryer Repair: Drum won't rotate, but the motor runs
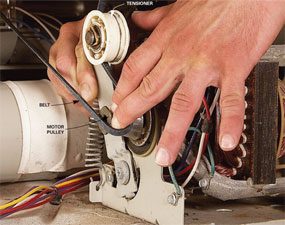
Replace the belt
Route the new belt around the pulsate and toward the motor/tensioner assembly. Reach your easily effectually the motor and retract the tensioner so you can wrap the belt effectually the motor caster.
Don't know how to set up a dryer chugalug? You're in luck—information technology's only a broken belt. Remove the front cabinet panel and elevator the entire drum out of the cabinet. Now'due south the time to burn up your shop vacuum and suck out all the lint. Then spin the tensioner roller by mitt to encounter if it runs smoothly and examine it for cracks. Replace the tensioner if information technology fails either test. Reinstall the pulsate and wrap the new belt effectually it (ribs facing the drum). Some tensioners are mounted backside the motor, and so they're hard to encounter from the front admission panel. You'll take to do this by experience. Reach your hands around the blower housing and lift the tensioner upwards while you road the belt around the motor pulley. Voila, you are now a dryer repairman.
Quick Fix for a Dryer Door
If your dryer door won't stay airtight, chances are the latch is either bent or missing, or the strike is worn. The fix is cheap and easy. Buy the parts from whatsoever appliance parts store. Then grab pliers, a couple of small, direct-slot screwdrivers and a roll of masking record.
Grab the aptitude or broken latch and yank information technology out. And then install the new ane, pushing in firmly until the locking tabs seat (Photo 1). Side by side, protect the door'south finish with tape and remove the old strike. Jam a pocket-size screwdriver into the strike and curve the metal locking tab inward. Pry upward with a 2nd screwdriver to pop it out (Photograph two). Snap in the new strike and yous're back in the laundry business.
Required Tools for this Dryer Repair Project
Have the necessary tools for this DIY project lined up before you start—you'll save fourth dimension and frustration.
You'll also need either a multimeter or a continuity tester and a small straight slot screwdriver.
Required Materials for this Dryer Repair Project
Avoid last-minute shopping trips by having all your materials ready ahead of time. Here'southward a list.
Originally Published: Nov 28, 2018

How To Fix A Dryer Witha Crack In The Metal,
Source: https://www.familyhandyman.com/project/clothes-dryer-repair-guide/
Posted by: godwinaces1963.blogspot.com
0 Response to "How To Fix A Dryer Witha Crack In The Metal"
Post a Comment